Calibration method for Projector using Checkerboard
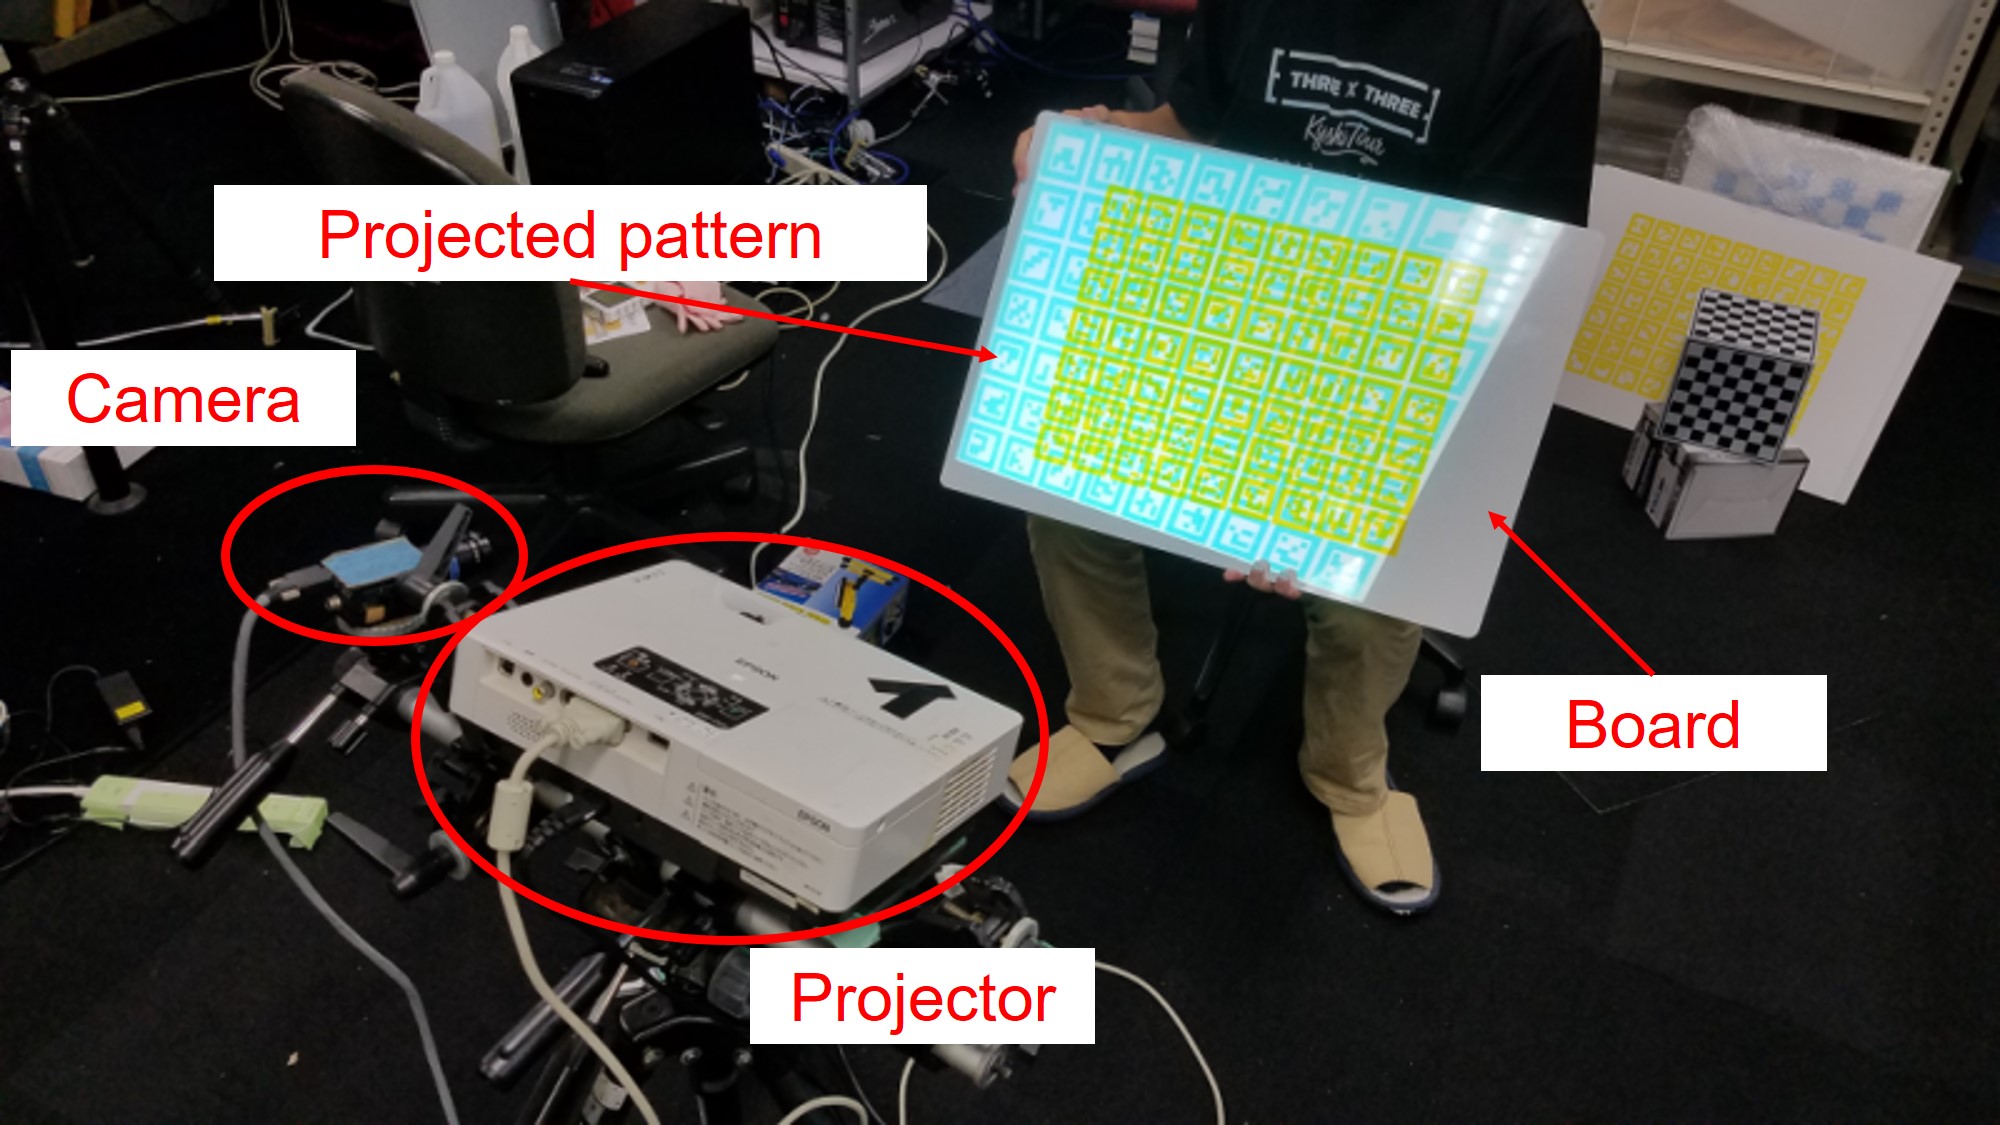
Introduction

OpenCV Camera Calibration has been improved to allow the calibration of the projector using ARtoolkit. This section describes how to use it.

Measurement

First, perform measurement. Print the yellow AR marker pattern on a paper and stick it on a flat plate (image is include in the downloaded zip file). Holding this plate, project a cyan AR marker pattern on the plate from the projector (if the pattern is too big, use the small pattern). Take pictures by changing the angle of the plate. To obtain an accurate result, it is better to take more than 40 measurements. Save the images as bitmaps.

For measurement

For the calibration of the projector, arrangement of the camera and the projector is as shown below. The camera should be located as close as possible to the pattern. To help you find the corner points, shorten the distance between the camera and the projector, when you get the images (to increase the accuracy of the intrinsic parameters). Unlike checker pattern, you don't have to care if the pattern is inside a image or not.
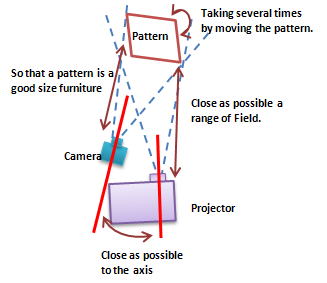
Start Calibration Process

Run the exe file

Run ARCalibGUI.exe
Command prompt starts, and after a while the AR Calibration window appears(It may take a few minutes to start up).

Button Name

Create Project

Choose "File -> New Project" or the "New Project" button to create a project. Here, recommend that you make new directory for this calibration project.
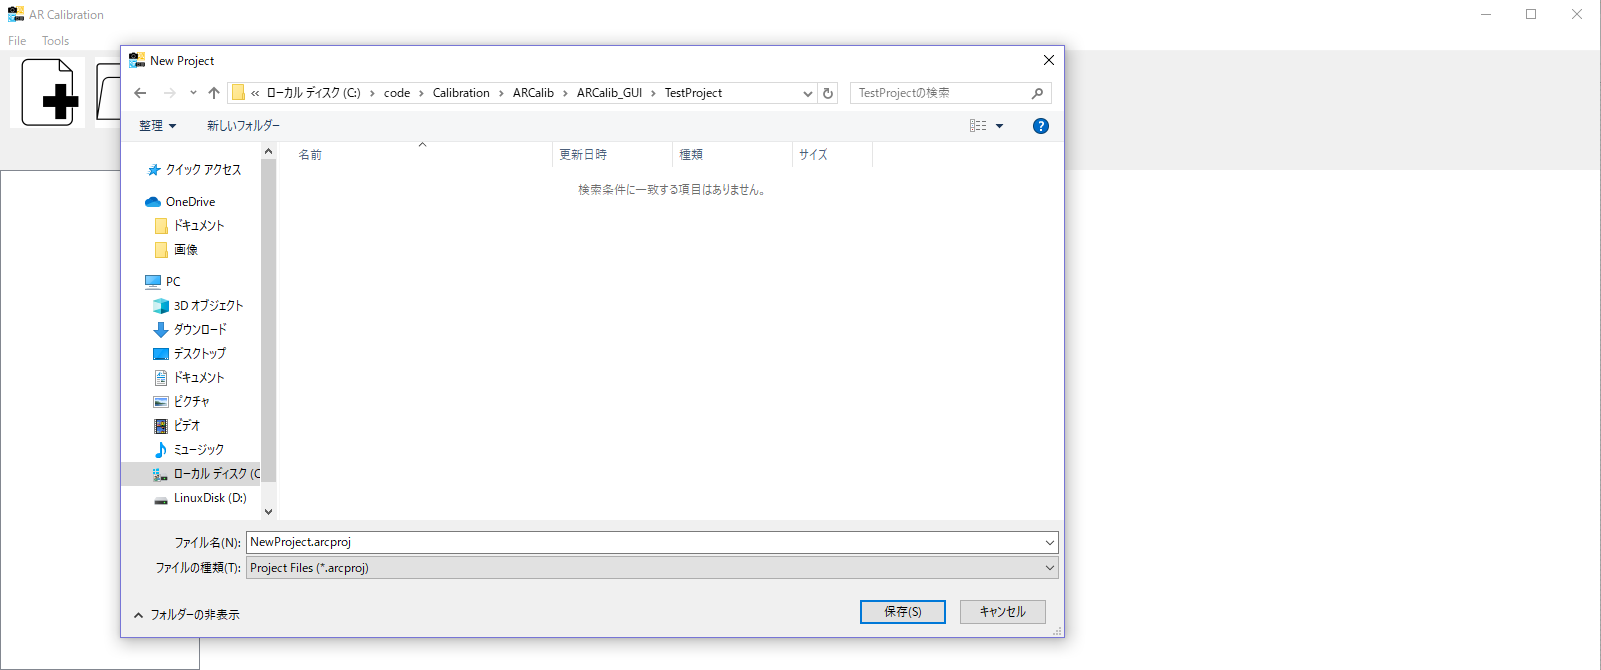
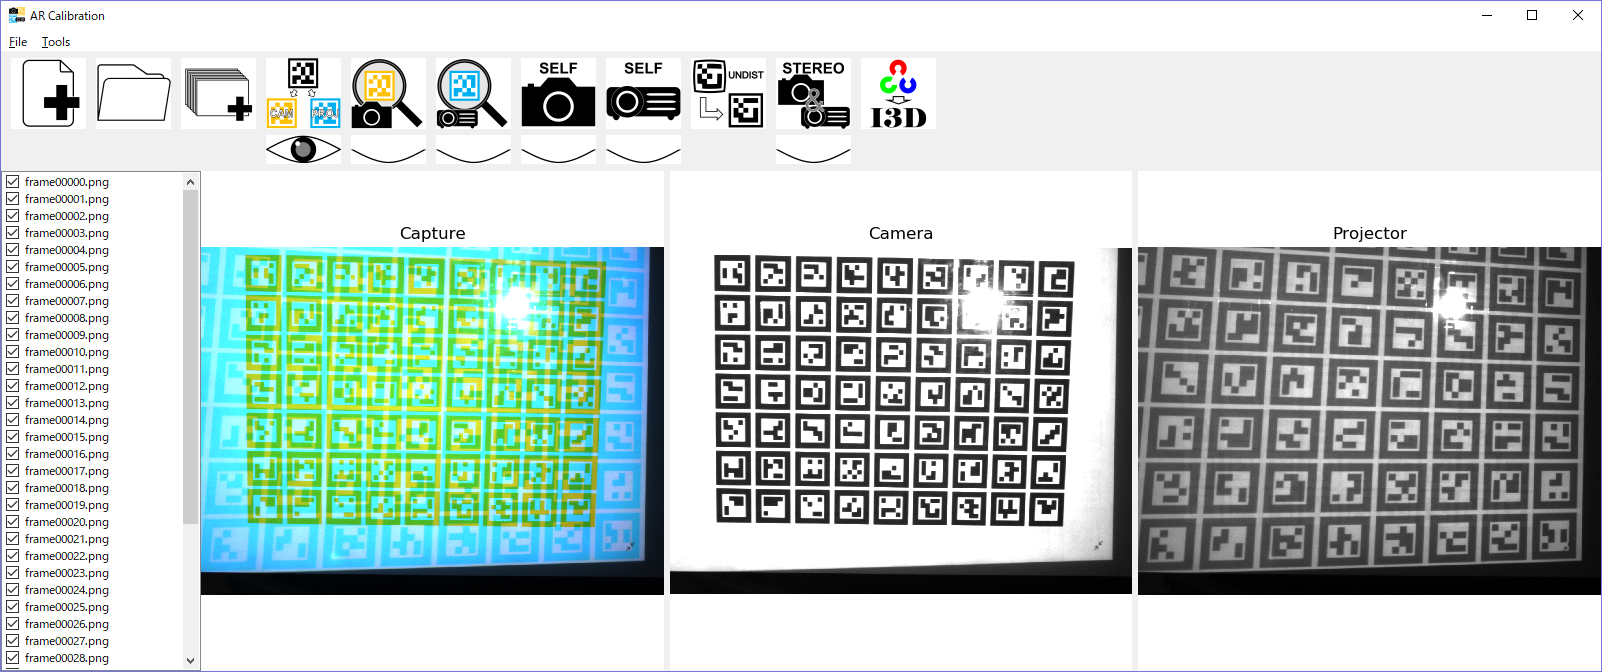
Load captured images & color isolation

After make project, click the "Open images" button to choose a directory that has pictures which you took just now. And then click "isolation" button to color isolation
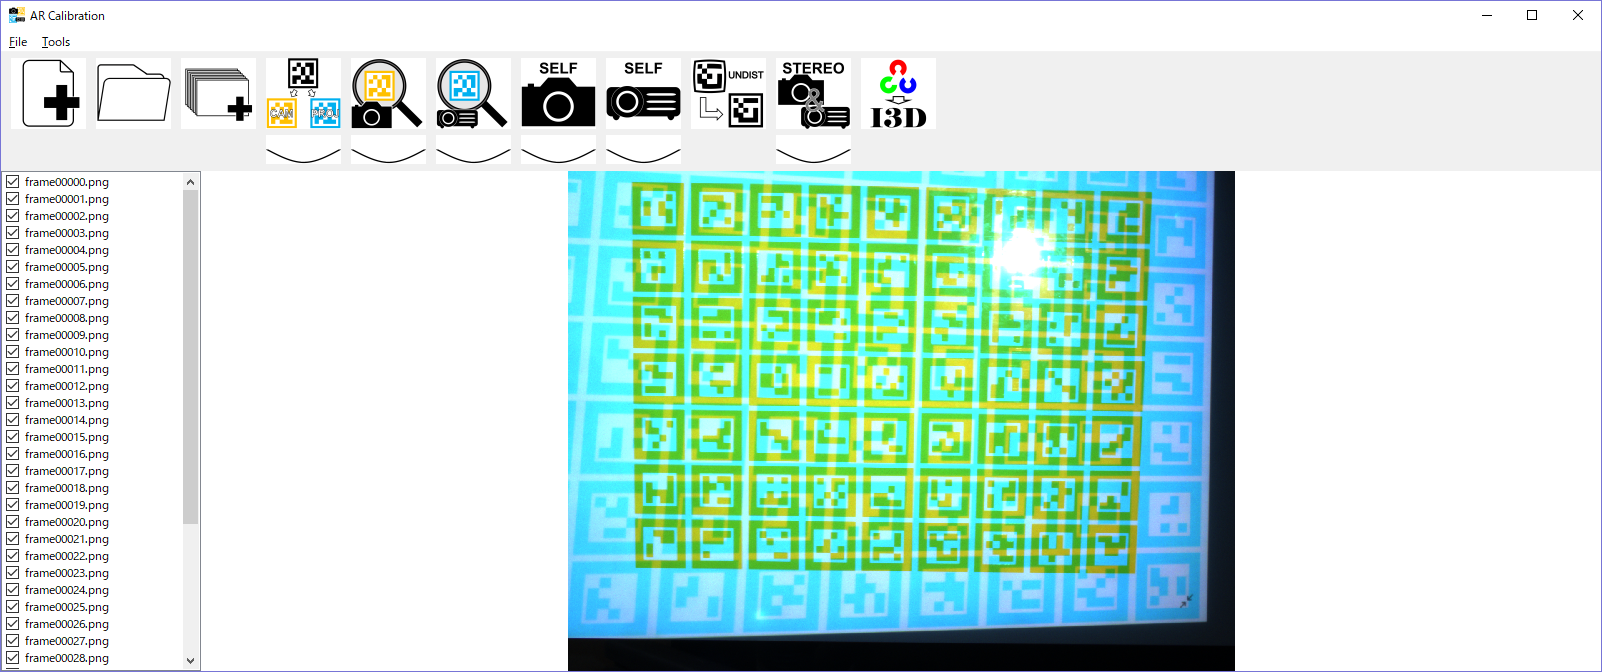
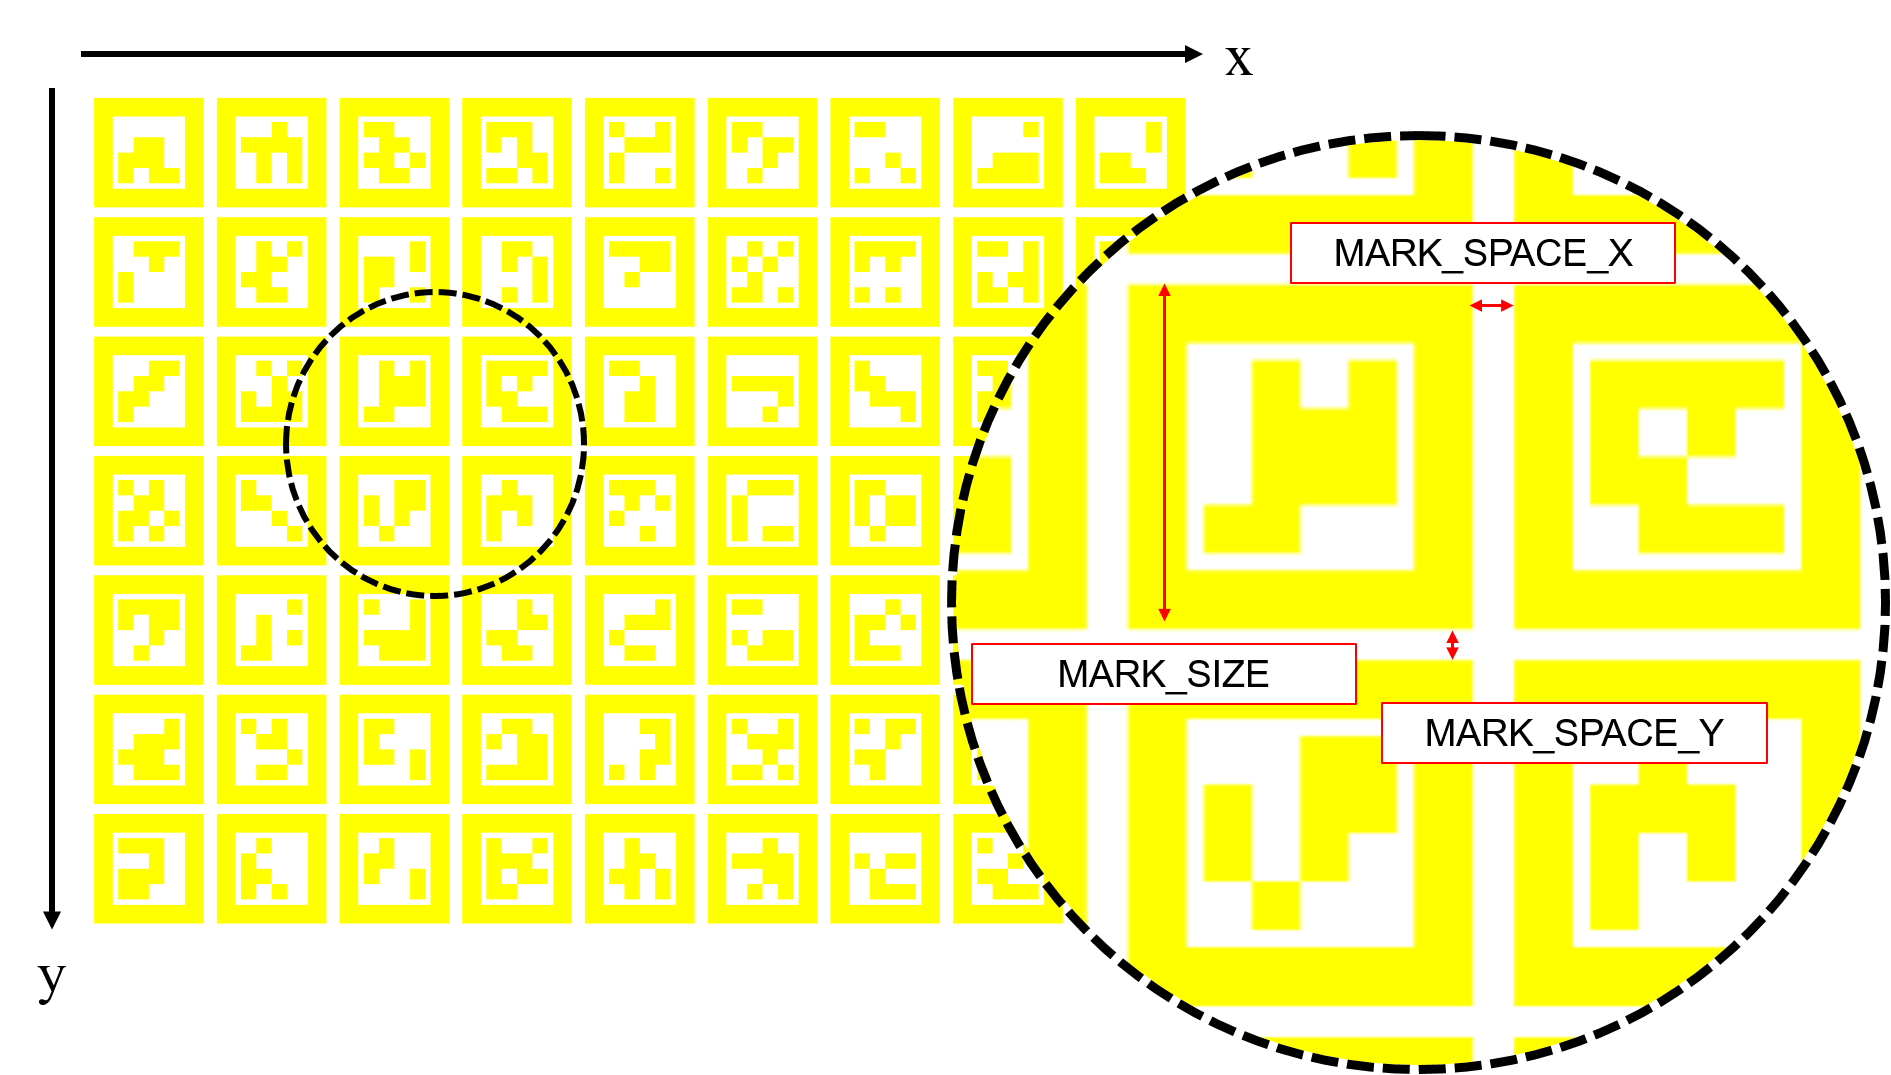
Detect AR marker

Click "detect Cam" button to detect AR marker in "Camera~.png". You will find the dialog to determine some paramters. What does each paramter mean is following:
  • Projection image : projected image file
  • AR thresh : threshold for marker detection
  • thresh first : first threshold of image binarization
  • thresh interval : step size of the threshold to binarize
  • thresh repeat number : number of binarization
  • Calib mode : projector or camera
  • 2D feature points : whether the center point of each marker or the four corner points of the marker are used as 2D feature points.
  • Adaptive thresh : whether use adaptive detection
  • Board rotation : whether the board is upside down
  • Minimum marker number : minimum number of detected markers allowed
  • MARK SIZE : the size of each marker(please check the following image)
  • MARK SPACE X : the space of each marker in x direction(please check the following image)
  • MARK SPACE Y : the space of each marker in y direction(please check the following image)
Specified each paramter and click "Start to detect".(Usually, you don't have to make any change these parameters.) When marker detection finish, images which have detected id number and each confidence rate are shown.
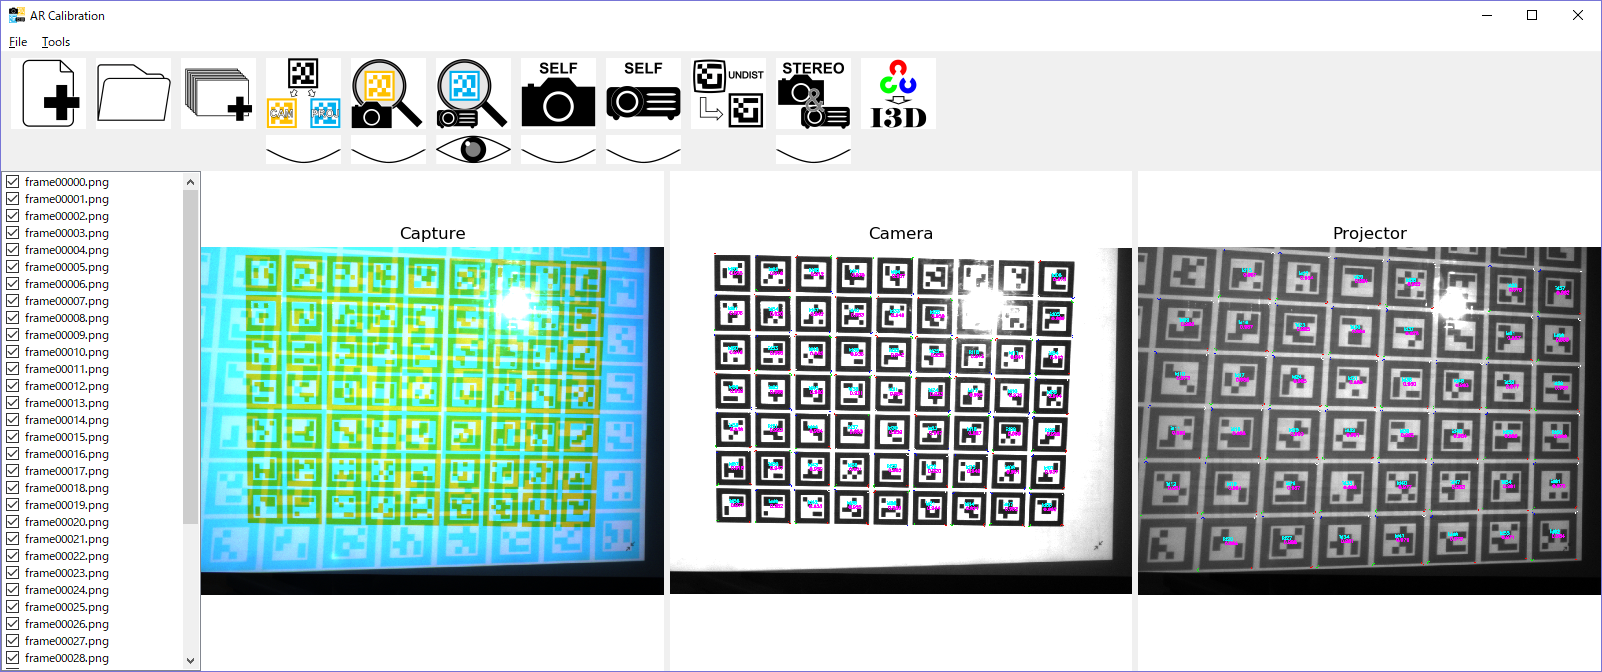
After detect AR marker in "Camera~.png", click "detect Proj" button to detect AR marker in "Projector~.png". Same dialog as "detect Proj" will pop up.
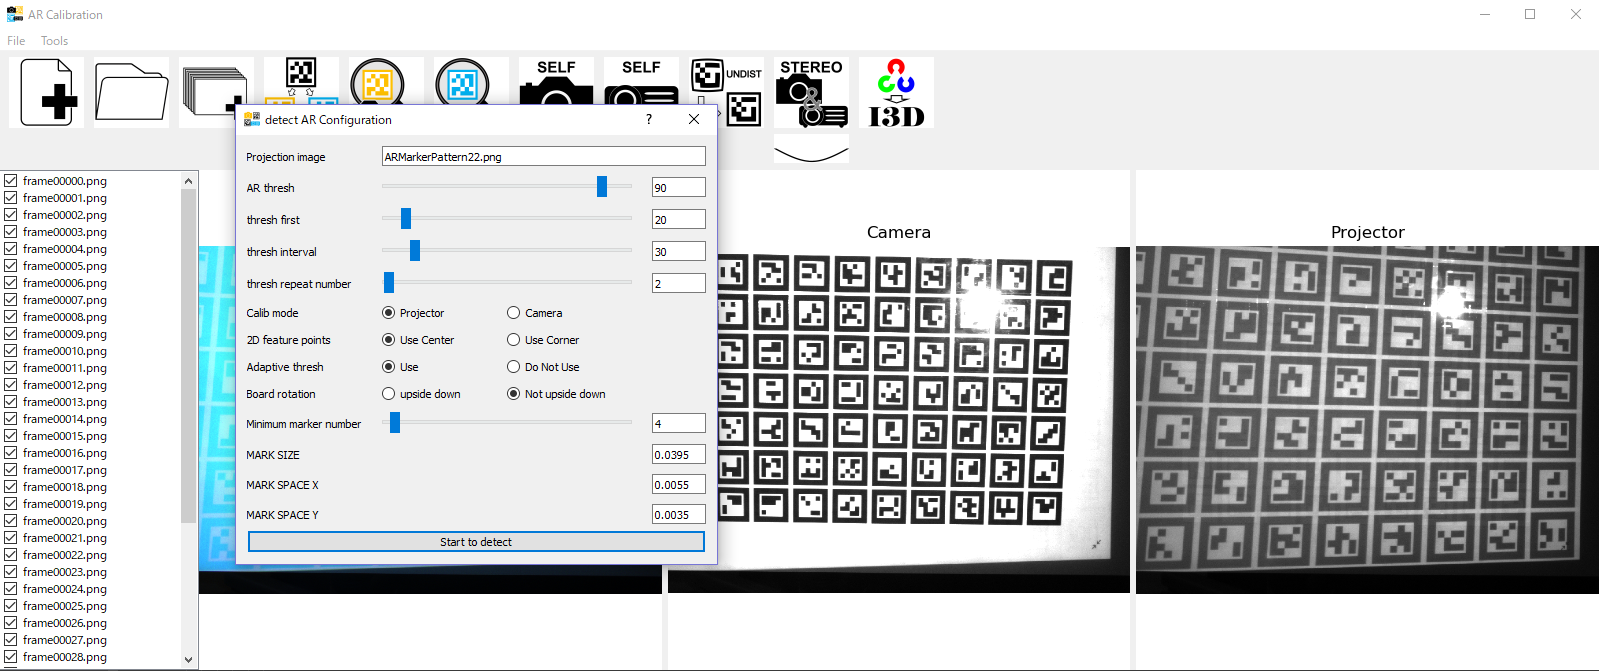
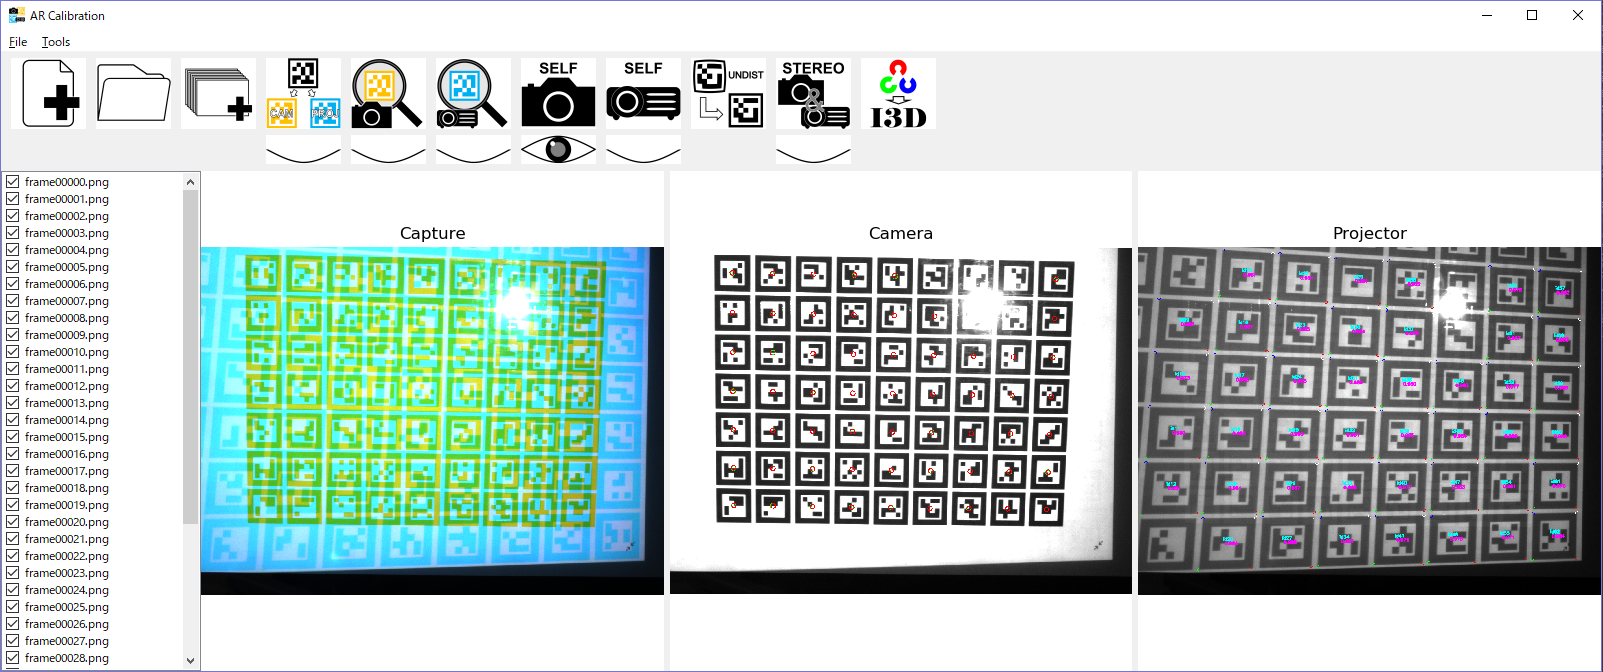
Self calibration

Click "Cam self calib" button. If you want to calculate distortion paramters, check "ON" button in a dialog. Click "Start selfcalib". After self calibration, you get images which have reprojected feature points. Next, click "Proj self calib" button. Here are no dialog because projector doesn't have distortion. (Actually, because self-calibration will be done in next step, this step is not necessary but for check the accuracy of detection.)
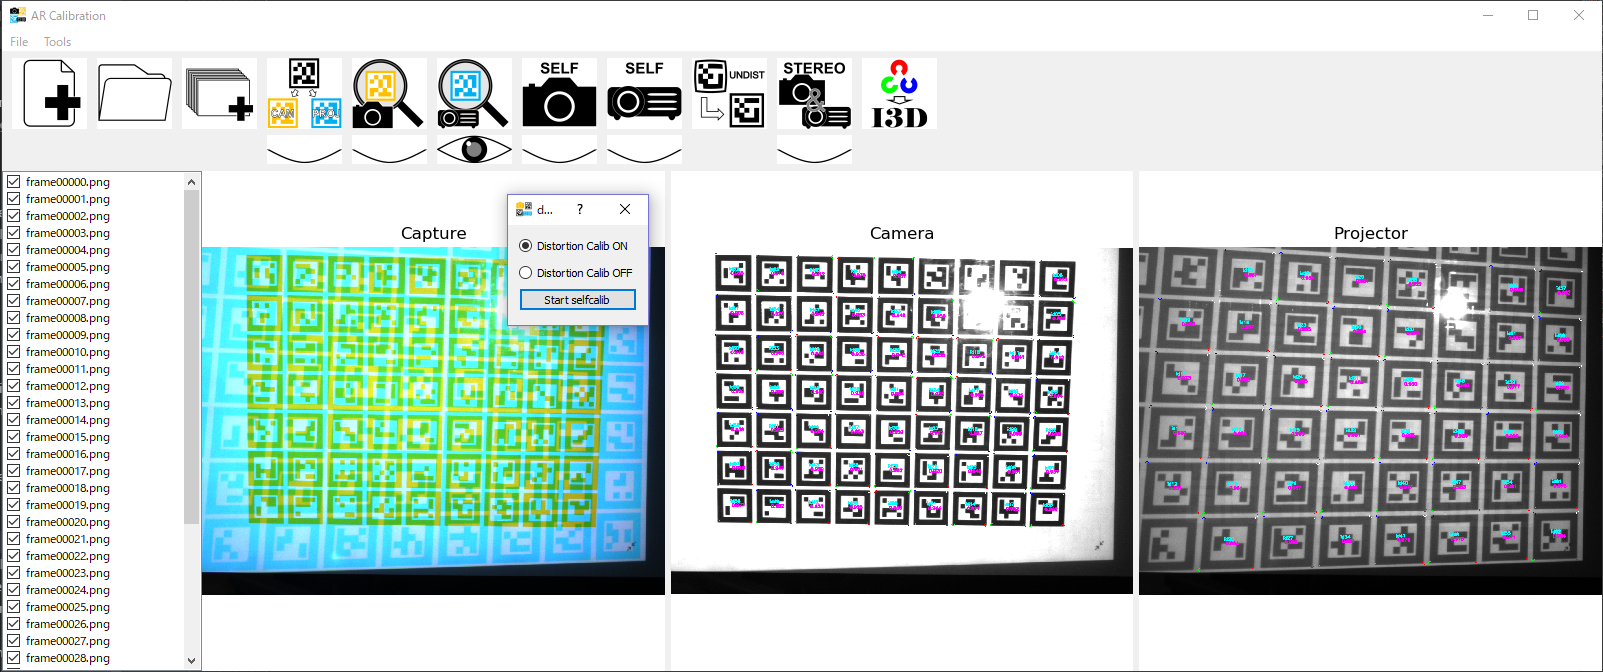
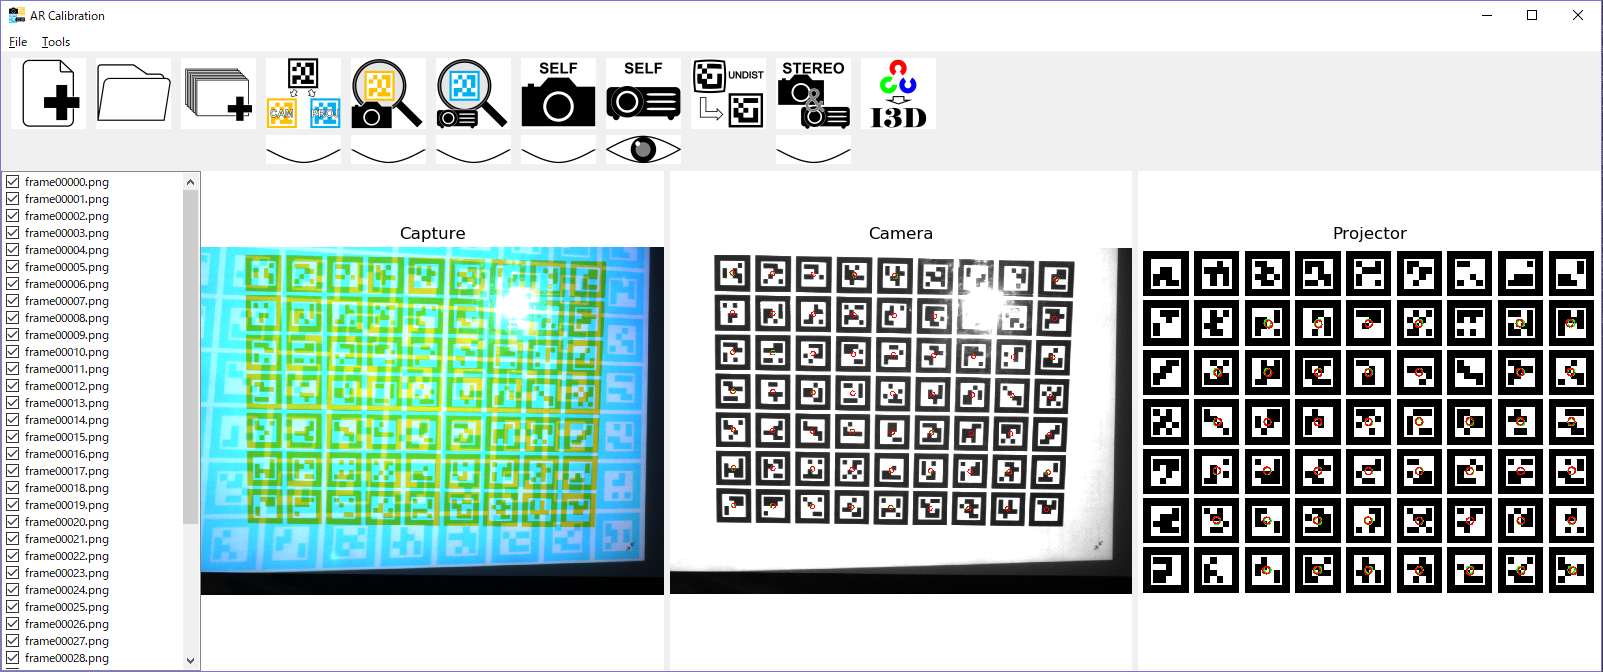
Undistortion (Option)

If you calculate distortion paramters in the previous step, click "Undistort points". You get undistorted feature points.

Stereo calibration

Click "Stereo calib". You get intrinsic paramters of camera and projector and extrinsic paramter between camera and projector.

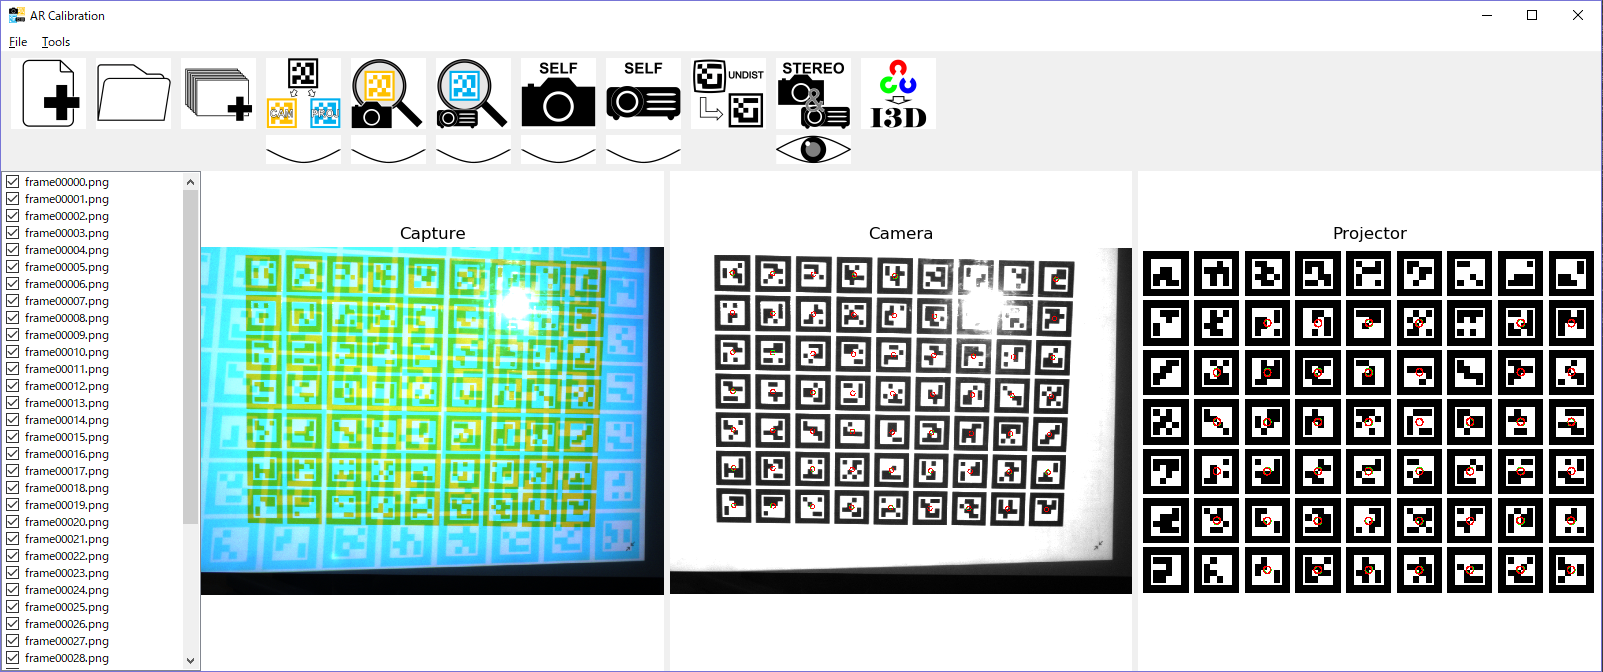
Convert parameter format from OpenCV to I3D

Click "convert openCV to I3D". Each paramter is output to 'param' directory.
  • i3d_camparam.txt : camera intrinsic parameter
  • i3d_projparam.txt : projector intrinsic parameter
  • projtocam.txt : extrinsic parameter from camera to projector
The constents of intrinsic parameter are following.
<focal length> <distortion parameter> <pixel size(x)> <pixel size(y)> <principal point(x)> <principal point(y)> <width> <height>
The contents of extrinsic parameter are following.
<translation(x)> <translation(y)> <translation(z)> <rotation in euler angle(x)> <rotation in euler angle(y)> <rotation in euler angle(z)>
Here, project file for I3D is created in the parent directory of AR Calibration project. When you use I3D, you must modify pathes of images.

Release note & Download

AR Calib by Python and OpenCV and AR toolkit: version 0.3.11 2020.09.02
  • [ Feature ] Undistortion bug on OpenCV fixed by using Ceres solver.
  • AR Calib by Python and OpenCV and AR toolkit: version 0.3.9 2020.03.07
  • [ Feature ] Changed "thresh repeat number" to "thresh end" on the dialog for AR marker detection.
  • [ Feature ] Open the project directory pushing "New Project", "Open Project" and "Open Images.
  • [ Feature ] Support different AR pattern image for camera and projector.
  • [ Support ] Added delete function for captured images on a preview window.
  • [ Support ] Show preview window during hovering cursor on the file list.
  • [ Support ] Added the button to open the active calibration project in the Explorer(Tool -> Open in Explorer).
  • [ Support ] Added the button to open this software manual on the browser(Tool -> Open Manual).
  • AR Calib by Python and OpenCV and AR toolkit: version 0.3.8 2020.02.25
  • [ Feature ] The distortion parameters are always set to 0 during stereo-calibration.
  • AR Calib by Python and OpenCV and AR toolkit: version 0.3.7.2 2020.02.01
  • [ Bug fix ] Bug fix on Abend when threshold set to 0 or 1 during AR marker detection.
  • [ Support ] Display version number on the console pushing each button.
  • [ Feature ] Change reprojected feature points size to match image resolution.
  • AR Calib by Python and OpenCV and AR toolkit: version 0.3.7.1 2020.01.30
  • [ Support ] Increased allowable image resolution(2048x2048 ==> 10000x10000).
  • [ Feature ] Changed the color of the detection result text to make it easier to find in case of mis-detection.
  • AR Calib by Python and OpenCV and AR toolkit: version 0.3.7 2020.01.29
  • [ Support ] Display undistorted captured images when push the undistort button.
  • [ Support ] Support rename I3D project when exporting calibration data in I3D format.
  • [ Support ] Modified to be able to change the number of optimization iterations for self-calibration and stereo-calibration
  • AR Calib by Python and OpenCV and AR toolkit: version 0.3.6 2020.01.20
  • Small bugs fixed.
  • AR Calib by Python and OpenCV and AR toolkit: version 0.3.4 2020.01.17
  • Support log file.
  • AR Calib by Python and OpenCV and AR toolkit: version 0.3.2 2020.01.16
  • Bug fixed.
  • Patterns are included.
  • Support generate project file for I3D.
  • AR Calib by Python and OpenCV and AR toolkit: version 0.2 2019.11.05
  • Created exe file
  • Improved the speed of displaying images
  • Added a button to browse pattern image
  • AR Calib by Python and OpenCV and AR toolkit: version 0.1 2019.9.23

    Sample date for test: Captured on 2017.12.01

    FAQ

    Q. Where are the prameters output?
    A. You can find OpenCV format parameters in /PROJECT_DIR/cam/param/ or /PROJECT_DIR/proj/param/ and I3D format parameters in /PROJECT_DIR/param/
    Contact us from here

    Publications
    Kawasaki Laboratory